Showing posts with label photography. Show all posts

22 April 2013

Spring is Finally Here (For Real, This Time)

After weeks of non-stop rain, the sun finally came out today here in Washington. Lunch at The French Bakery and a trip to the park were definitely in order.

His and hers lattes.


Tulips at the mall.

Zara at the park (underneath the play structure).
Happy Zara at the park.

Flowers for Daddy


Pin It!

12 April 2013

afternoon in seattle

It's spring break for us, so we've doing little outings this week. Yesterday, we spent a few lovely hours in Seattle yesterday. Zara's preschool class saw Adventures with Spot at Seattle Children's Theater and then we had lunch at Racha Thai.


This is a great example of how Sofia and Zara feel about getting their photos taken.

As you can see, the sun did not put in an appearance. It's been raining all week! Hopefully, we will get luckier this weekend. I want to do some gardening!


Pin It!

05 April 2013

My Lovely Stash

If you missed my post introducing this new photo series, My Lovely Stash, go here.


By far, scrapbooking supplies (from paper to embellishments to tools) are the most represented items in my stash.

If you haven't scrapbooked before or stepped into a scrapbook store (in real life or online)  in a long time, you may not have seen the gorgeous supplies available today.

One of my favorite scrapbook designers is Elizabeth Kartchner: her style is young, trendy and oh-so-lovely!

Gold sequin trim, striped clothespin

Check out this gold sequin trim.

And these printed chipboard pieces. Love the hand-drawn fonts and the modern color scheme.

Printed chipboard by Dear Lizzy (Lucky Charms Collection), leaf stickpin, mini Instagram.
Bone china tea cup saucer and kamani wood tray (thrifted).
I will always love scrapbooking and taking photos. And so, I will probably always be buying more scrapbook supplies to add to my lovely stash.

Thanks for stopping by today!


Pin It!

29 March 2013

My Lovely Stash

I have a confession to make. I am a hoarder.

As a scrapbooker and now a craftypreneur, I have accumulated a lot of stuff in my lifetime:
Paper (so much paper), tools, finished projects, in-progress projects, supplies for projects I will probably never start.

I've tried to clean up my studio many times, but it never quite works because I can't get rid of the Stuff. Can you relate?

So instead of trying to purge everything, I thought I would try something new.

I will take a photo, showing off my supplies in a  pretty way. Because isn't that why I hold on to them? Because they are pretty, too cute to throw out or chuck. They have potential to turn into to something even cuter (or at least they do if I had the time/energy/fill in the blank).

I hope to share photos of My Lovely Stash on my blog on a regular basis. Hopefully, I can find (and share) some inspiration, clean up my room a bit, practice my photography and finally put some of these goodies to good use!


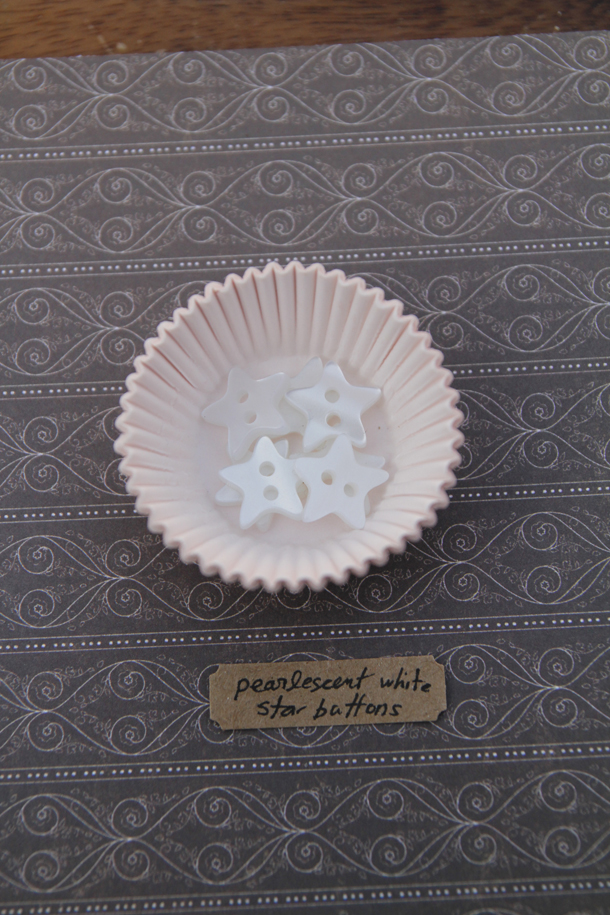
Mini cupcake liners, star buttons, scrapbooking paper, kraft paper, paper punch.


I thought I'd start small. These are some star buttons I picked up at Joann's. Little bits of pretty. I was sorting through a box of miscellaneous Stuff and found these buttons along with these cupcake liners and this pack of scrapbook papers. I wrote the caption on a kraft paper punched with my favorite paper punch.


Thanks for stopping by today!


Pin It!

11 March 2013

Etsy Love: Goody Jar

I am not the only avid Etsy shopper in my family. My eight-year-old daughter has bought a handful of items (with her own allowance!) from wonderful Etsy sellers in the past year or two.


She immediately fell in love with these "sweeties" from the GoodyJar when I showed her a photo. (Yes, I am such an enabler!) She didn't have enough money saved up at the time, so she had to wait a few weeks.


via GoodyJar

Every few days, she would mention how much she wanted them and take a peek online to see them.

When we finally ordered them, the shop just so happened to be offering Free Shipping for the sweeties! So I guess it was a good idea to wait ;) I also wrote a short note to Robin of GoodyJar to tell her how much my daughter was loving her items and couldn't wait to receive them. She replied quickly, saying that she would include a special gift for Sofia!


A few short days later, we got a sweet package.

Sofia opens the sweetly packaged items as Zara watches on. Washi tape and hand-drawn word art? What's not to love?!


The extra-special free gift just for Sofia came in a polka-dot glassine envelope! So unique and that extra something that made Sofia extra happy ;)


Cuddling her sweeties. I think she likes them!


I'm so happy Sofia loves handmade crafts as much as I do. And even happier that she is more than willing to save her own allowance money to buy the items she falls in love with. (Sofia has her eye on this item next.)

*****

Check out the GoodyJar shop here.
Or Robin's beautiful blog.

Thanks so much for stopping by today!


Pin It!

19 January 2012

say happy valentine's day with a heartfelt hoop art

More and more, it seems like I've been preparing myself (without knowing it) to open up an Etsy shop.

I've always been drawn to pretty things, typography, handmade.
I've been a paper-crafter for over a decade.
I take hundreds of photos every year.
I've been a digital scrapbooker for the past 6 years (and know a few things about Photoshop).
I had a brief career as a professional writer/editor.
I've written tutorials for a digital scrapbooking magazine.
I've been blogging for 8 years (mostly for myself, friends and family).
I've been published in national scrapbooking magazines.
And....I love shopping on Etsy!

this one is in my shop :)


Today, my digi-scrapping skills (basically scrapbooking with Photoshop) came in handy when I made a new banner for my shop.  I like idea of using the banner as your own adspace. So I plan to update the banner for the seasons and holidays or when I have a new collection or sale.


click for larger view


TIP: In case you like the font I used in the banner, it's Quicksand. And you can download it at Fontsquirrel for free! The best part is that it's okay for commercial use too. I just discovered this site and I already love it.

++++++

In other news, there seems to be a lot of buzz around the internet about two craftworthy events:  Alt Summit  and Winter CHA.

I just heard about Alt Summit a few days ago when Brittni mentioned it on her blog. It sounds like a great way to spend a few days. I've been following some of the tweets on twitter from some of my favorite bloggers and designers like her, her and her! (Type in #altsummit in the searchbar at twitter and you'll see what I mean).

CHA is another big deal in the crafter's world that is coming up at the end of the month. As a reformed scrapbooker, I've been following this conference for years. I've never gone, but it seems like my kind of convention! (Of course, I'd have to get over my social anxiety, but the thought of seeing all those lovely products in person, might help me along!) Lots of sneak peeks of soon-to-be-released items are popping up. A few of faves so far are this one and this one and this one.

via Sasha Farina's blog


via Crate Paper blog

So are you excited about CHA or ALT? Have you ever been?


p.s. And if want to check out my heartfelt hoop art, please stop by my shop. I have lots of hoops ready to ship.
Pin It!

23 December 2011

happy holidays!


Our Christmas Card

I made our Christmas cards again this year. Now that I have scaled back my digital scrapbooking since I opened my shop, it was nice to fiddle around with Photoshop again. This card is basically a 4 x 8 print  (I used Winkflash). The digital journaling card and banner are by Paislee Press and all the photos were taken by me.

Did you make your own Christmas card this year? I'd love to see it. Please leave a link in the comments.

Happy Christmas Eve Eve!
Pin It!

20 December 2011

thankful tuesdays

I am thankful for:
-neighbors who deliver home-baked Christmas cookies (got two deliveries on Sunday!)
-friends who introduce me to new foods (one of my besties gave me a jar of Korean citrus marmalade that you can mix with hot water to make a tea or spread on your toast. yum!)
-sisters who love each other and give each other lots of hugs
-free printable Christmas tags everywhere on the Internet (these are my fave: this, this and this
-simple Christmas packaging (I'll show you a couple of ideas tomorrow!)
-finding new thrifty blogs like this, this and this


thank you card I made for one of our neighbors.
Pin It!

13 December 2011

DIY: heart-shaped bokeh (my very 1st tutorial on the blog!)


I've always loved bokeh.
Even before I knew what bokeh was.

There is a photograph of me when I was a kid. I am in sharp focus and the background is blurred. I always thought it was a "good picture," but never knew why. There was something about it that made me take a second look. It was the only photo like that in our family albums.

It wasn't until decades later, that I found out what bokeh is.

Bokeh is the word for that blur you get in photos. According to photography.com, the word bokeh, derived from the Japanese word “boke” translates to ‘fuzziness’ or blur.

Bokeh is usually in the background, but you could also blur the foreground if you want to call attention to something behind it. It's one of my favorite technique that I use over and over again. I use it when taking portraits of my daughters. I use it when taking photos of my items for my Etsy shop.
In the shot on the left, my focus is on the button on this felt flower. This focuses your eye on this one detail. The shot on the right focuses on the entire wreath with my daughter out of focus (but still recognizable) in the background.

Most recently, I discovered another fun way to use bokeh. The shaped bokeh! There are some great tutorials out there on how to create your own shaped bokeh, namely here and here and here. This tutorial will share my experiences and how you can  turn your "ordinary" bokeh photos like this:


into shots like this:


by making a simple lens hood like this:

The lens hood is not so pretty, but your photos will be!


How-to make the lens hood:

1. Before you make your lens hood, you will need to decide which lens you will be using. Choose your  largest aperture lens. I used a Canon 50 mm F/1.4 lens for my Canon dSLR.

2. To create the lens hood, use your lens cap as a rough guide. Place your lens cap on the black paper and cut around the cap, adding about 1/2 - 3/4 inch to the diameter. You want the hood to fit snugly around your lens, but not too small that it won't fit at all. My hood was about 3 inches in diameter.

3. Now it's time to make the heart.
The size of the heart does matter. For my 50 mm 1.4 lens, a 3/4 inch heart worked great. For more tips on how big to make your heart, you might want to check out this.

The placement of the heart also matters. You want the heart in the center of the hood. One way to do this is to fold the circle in half and cut out half a heart. By folding the circle first, not only will you get a symmetrical heart, but the fold in the paper will tell you where the center of the circle is.

4. Next, cut a strip of black paper long enough to wrap around the diameter of your circle with some overlap. The strip should be about 1 1/2 - 2 inches wide.

5. Tape the strip to the circle, making sure all the gaps are closed. Double-check to see if your hood fits on your lens. It should fit snugly enough so that it doesn't fall off. If it's too loose, try using a rubber band to keep it on your lens.

Setting up the shot:

You'll need:
-Subject - it might be easier to practice on an inanimate object (or a very patient person) when you're starting out.  For the ones of my daughter, she was seated on a comfy chair and watching tv. She wasn't going anywhere!
-Lights - This is what will turn into the hearts. I used my Christmas tree which had several colors of lights on it. You can also use outdoor lights, street lights etc. The more lights you have, the more hearts in your final photo.
-Camera with your large aperture lens attached
-Lens hood that you made

Taking the shot:

1. Place your subject far away from the lights. On my first go, I made the mistake of putting my subject right next to the Christmas tree. Did not work.

2. Set your aperture to its lowest setting (so its wide open).

3. Focus on your subject.

4. Switch to manual focus mode and place your lens hood on the lens. (You should not see the hood or the heart shape in your viewfinder. See my outtake photo below.) Take the shot!

My first successful shot!

If you just want the heart lights alone, remove your subject and shoot (without refocusing). You should get something like this.


Experiment with where you place your hearts in the photo. In the photo of my daughter lying down (4th photo from the top of the post), it looks like the hearts are floating above her. In this photo, the hearts are more of a background element (And you can also tell that it's the Christmas tree in the background.)


You can also experiment with the shape that the lights are making. In my example, the shape is a Christmas tree. But you could hang your lights in any shape you want, like a heart or a circle. (Maybe I'll try that next!)

If you're like me, it might take you a few tries (see below for some of my outtakes) to get the hang of it, but once I got that first heart-shaped bokeh, it was magical!

Learning from my mistakes (my outtakes)

I thought I would share some photos from my first attempts. It will help you see what not to do.
Learning from my mistakes.
1. My first attempt. I was using my 17-50 mm F/2.8 lens so my heart was way too big for my aperture. It gave a heart-shaped vignette instead of a heart-shaped bokeh! My subject was also way too close to the lights. Not enough blur.

2. On my second attempt, I used a much smaller heart and the same lens. The heart ended up being too small. Not the magic I was looking for. 3. In the end, I went back to the hood with the larger heart (as pictured) but changed my lens to my F/1.4 and moved my subject farther away from the lights. Success!

Now I can't stop!

Here's one more shot before I go. And it happens to be one my new felt hoop art that I'll be putting in the Catshy Crafts shop very soon! I think the heart bokeh goes well with this particular hoop ;)


So.....Thanks for reading my very first tutorial on the Catshy Crafts blog! I hope this tutorial will help you make your own magical photos. (And if you do, I'd love to see them. Please link me up in the comments.)

Pin It!
Related Posts Plugin for WordPress, Blogger...