


The first was my fall felt wreath. I loved it so much, I actually I made it twice.
 |
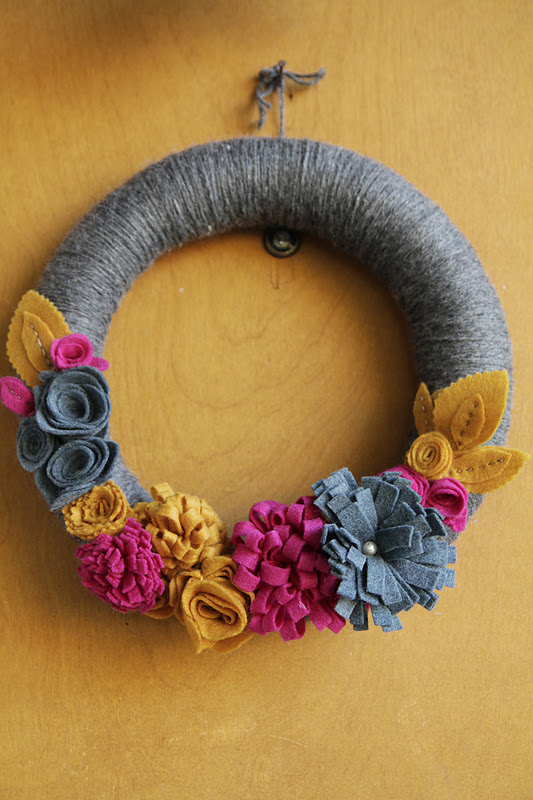
| fall felt wreath no. 1 |
 |
| fall felt wreath no. 2 |
So after a few days of recovery and deep breathing, I wrapped a second green styrofoam wreath with the same brand of yarn. (Even though the photos look like different colors, but they are not). I had bought double the material, thinking I'd make another wreath eventually. I used more yarn than I did the first time, just because I thought it might protect it better in case, the wreath fell again. I was able to rip off the flowers from the broken wreath (hot glue is really strong stuff!), but a few of the smaller leaves and blooms didn't survive. So I made some new leaves (in goldenrod).

As for hanging the wreath, I wrapped a length of the same grey yarn several times around the top of the wreath so it would blend in. Then I tied a triple knot on top, leaving a gap between the top of the wreath, so that I could slip the yarn over the nail. Notice how the peephole in the second photo is almost covered by the wreath, compared to the first wreath, where it is centered. The original tutorial had suggested a using a ribbon to hang the wreath, but I didn't have one that I thought would go well with the wreath. Considering what happened, next time I might try harder to find a ribbon!
And here's a look at the wreath with my other Halloween decorations.
 |
| My two kitties. |
The cat, owl and jack-o-lantern were inspired by the October 2011 issue of Martha Stewart Living. I also found instructions on her website here from 2008. I used 9 x 12 construction paper that I had at the house for the cat and owl and orange 12 x 12 cardstock for the pumpkin. I didn't follow the instructions but used the same accordion-folding technique for making my wallflowers. I also made the faces cuter rather than scary. Sofia cut out the black shapes for the pumpkin. There happened to be three nails on that wall already (from a previous owner).
 |
| halloween hang-ups |
The black spiderwebs are cut from a garbage bag similiar to how you make paper snowflakes. I followed How About Orange's tutorial here. Originally I had them inside the window, but they were hardly visible from the street because of our window screens and our windows. So I moved all but one of them to the outside where they flutter in the breeze.
 |
| garbage bag webs |
The final touch was a toy tarantula that Jamie has had since college. I just used the same grey yarn leftover from the wreath to tie it to a nail above the door (which the previous owner had left as well). I wonder what decorations they had up there!
 |
| eek! |
I also lined up several gourds along the planter and a little witch rubber duckie in one of the empty flowerpots.
 |
| rubber witch duckie |
 |
| two jacks |
Thanks to a tip from Martha, we decided to cut the holes on the bottom instead of the top so we could fit the pumpkins over our battery-operated candles and not worry about the top fitting back in. The small one didn't quite fit, but I like how it looks a little like a pedestal and raises it up.
And there you have it! Hope you had a wonderful Halloween!


0 comments:
Post a Comment
I'd love to hear what you think! I love reading your comments.