


 |
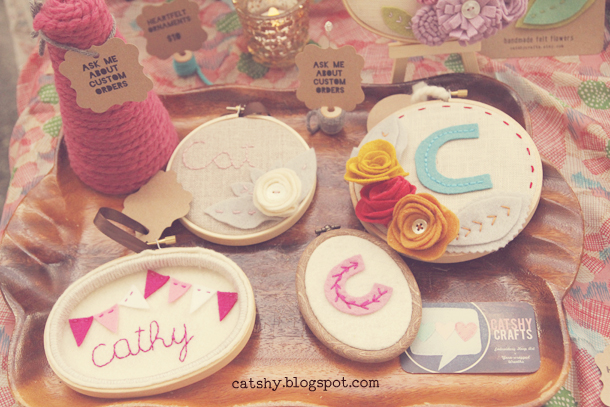
| 1. Vintage Tray for Hoop Art 2. Me at my Booth at EtsyRAIN Handmade Holiday Show, Nov 2013 3. Framed Bulletin Board 4. Vintage Teacup Saucer for Business Cards 5. Cigar Box for Felt Flowers 6. Thrifted Bulletin Boards for Hoop Art 7. Spinning Rack for Mini Wreath Ornaments 8. Wooden Tray for Hoop Art |
This is my final post on my mini blog series about my first craft show experience. If you want to read the other posts, I have links at the end of this post :)
*****
My favorite part of selling at a recent craft fair was designing my booth display. Imagine creating a space full of your handmade items. Wouldn't that excite you too? Spark your creative energy? Or would it be overwhelming? Turns out, it was all of the above.
When I started the designing process, I knew that I wanted to keep my booth super simple. No elaborate set-ups. I wanted to keep it in line with the feel of Catshy Crafts: colorful, homespun, and crafty with a bit of vintage flair thrown in. Because I love thrifting and because I am on a budget (who isn't?), I used many thrifted finds in my display along with items I bought or created myself.
In this post, I will show you my craft booth in detail and show you how I mixed thrifted and vintage finds with store-bought and handmade items. Sound fun? Yay!
Overview of my craft booth
Before I get into the delicious details of my booth, here are some generals. My allocated booth space was 8" x 10" but as you can see from the blue tape on the floor in the photo, it went a little outside of that area. I had enough room for a 5-foot long table (which I bought at Walmart), a vintage Samsonite 4-foot card table (which I bought at Goodwill for $5) and a multi-tiered clothes rack for my wreaths.Leaning against the rack is a framed bulletin board that I DIY-ed from a garage sale picture frame (more details on this later in the post). Up front is a small wooden table for my business cards and a mailing list sign-up. Behind me, I took advantage of the curtained metal structure in front of the windows that the show organizers put up. I hung my Catshy Crafts sign (which I made from a quilting hoop and felt) and a felt bunting that I made for my art show a few years ago.
 |
| My craft show booth at EtsyRAIN Handmade Holiday Show, November 2012. |
L-Shaped Layout
It was after lots of trial and error using my mock display in my living room that I decided on this layout. I toyed with the idea of having two card tables because I already owned them and didn't want to buy a longer table that might be difficult to set up and transport. But in the end, I eliminated one of the card tables (which was heavy and not-so-portable) and bought a foldable 5-foot table that could fit in the backseat of my car. |
| Mock Display in my Living Room |
I am happy I did. This modified L-shape configuration allowed the customers to "enter" the booth and gave me more surface area than one table. Plus, I was able to sit behind the longer table and interact with my customers.
And now onto the good stuff!
Thrifted Finds
The vintage or thrifted items I used roughly fell into three categories.- Vintage/Thrifted Things I Already Had
- Vintage/Thrifted Things I Bought Specifically For the Craft Show
- Vintage/Thrifted Things I DIY-ed to Make it Work
Pin It (bulletin boards)
As I was creating inventory for my booth, I quickly realized I would need a way to display my hoops. because they would not all fit flat on the table. I needed to go vertical. But I didn't want to end up with 6-foot high display (maybe next year) that would be hard for little ole me (i'm 5-feet-tall) to set-up. So I set my sights on bulletin boards. I picked up a couple at my favorite thrift shops. They were portable, easy to pack and inexpensive. To prop them up, I used a two metal easels that I got in the plate display section of Joanns. One easel was not sturdy enough to support the weight of the bulletin boards, so I used two each. These displays showcased by mini hoop art (2-3-inch).
Using pushpins, I was able to hang up to 8-10 mini hoop art on each board. This gave me more room on my table and allow them to be seen better from someone walking by. I was also able to pin my little price signs (more on this later) directly to the board.
Frame It
I also created a larger bulletin board using a vintage picture frame, which I bought at a neighborhood garage sale two summers ago. After using it as photo prop for a family photo shoot, the ornate frame gathered dust in my studio...... |
| Before |
....until I re-imagined it as a display board for my larger hoops. I simply cut white foam board to size, lay cork on top (bought as a roll from Michaels) and attached to the frame using duct tape. It's a temporary attachment because I wanted to be able to remove the board if needed. This altered frame held my larger hoops (5-6-inch). To add light, I used a clip-on lamp attached to the bottom right corner of the frame. I loved how the framed bulletin board turned out.
 |
| After |
Or I could use it to display my wreaths as I used it in this photo for my shop.

Either way, I think it's a versatile piece for my studio and future craft fairs.
Note for next time: I think I need a way to get it off the floor and at eye level.
Serve It Up (wooden trays)
As I mentioned in a previous post, I love wooden trays. I use them in my product photos. I use them as a work surface when I'm crafting on the living room couch. I use them to organize my crafting tools. And I used them at the craft fair. I arranged my hoop art on various wooden trays. It was a good way to contain my items as well as give a great backdrop to my hoops.
 |
| This carved wooden tray is my favorite. A vintage find from my local church thrift store. |
 |
| I had two of these simple wooden trays. |
Box It Up (cigar box)
On the first day of the fair, I noticed that my flower sets packaged on kraft paper were popular - almost everyone visiting my booth commented on them or picked them up to take a closer look. However, they were puzzled as to what they were used for. A few sets sold, but many of the flowers kept falling off. For the record, they are temporarily attached to the kraft backing with repositionable glue dots for packaging. They are meant to be removed and used as embellishments. I ended up writing a little note, but inevitably people would ask anyway.
So on the second day, I removed them from the backing and sold them individually. That way, the customer could choose which flowers she wanted. Priced on sale at only $1 each, they were selling lot hotcakes and I ended up making more while I was at the craft fair.
To display them, I used a vintage cigar box and added a sign to the lid.

Before the craft fair, I had used the box as a photo prop to show all the flowers I've been making. Again, I love the character of the wood, the rich color as a backdrop for my bright felt blooms. Also, at 99 cents from Goodwill, it is easy on the budget.

Tea anyone? (business card display)
On the first day of the show, I had placed my business cards on one of the trays with my hoops. But I noticed that people were not picking them up or asked me if I had a business card.On the second day, I changed it up.

I brought in a small round table (which I picked up at the same neighborhood garage sale where I got my ornate picture frame). On top of this table, I placed my mailing list clipboard (also a thrift store buy) along with my business cards stacked on a pretty vintage teacup saucer (also from the thrift store).
By placing the table a bit in front of my main table (see the overview shot above), customers could easily pick up a card and sign-up for my mailing list without blocking the customers who were browsing my wares. I was a little scared that the saucer would fall and break because the clipboard was underneath the saucer, but it was all good. Plus I got way more mailing list sign-ups on the second day. On the first day, I had no place to keep the clipboard so I didn't get any sign-ups.
Note for next time: I plan to use a much smaller clipboard for my mailing list, so it will be less cumbersome and easily fit on the table a long with my business cards.
Cover It Up (table coverings)
As I mentioned earlier in this post, I had two main tables to display my items. I needed something to cover the tables. Instead of using tablecloths, I decided to use a queen-size bed sheet that I bought months ago at Goodwill. At the time I bought it, I was imagining that I would use it as fabric for my hoop art. But, it was such a pretty vintage pattern, I didn't have the heart to cut into it. Fast forward months later, I'm glad I snagged it (and only regret that I didn't pick up the other matching sheet). It was big enough to cover my 5 foot table and the pattern was soft and pretty and not too busy to compete with my items.For my smaller card table, I used a silk scarf I bought at Goodwill. The pattern was brighter, but I think it still worked.
I loved the vintage touch of these table coverings and the color they brought to my booth. I don't use stark white backgrounds in my item photos, so why would I used white tablecloths for my display? Not only did I save money in the process, I can re-use these items for other things.
Take a Spin (spinning rack)
I am not sure what this little spinning rack was originally intended for, but I found it at Goodwill on one of my thrifting trips. By using small clothespins, I was able to hang my mini wreaths ornaments. And yes, it does spin (although I don't think anyone actually tried to spin it.)

Baskets (couldn't think of a clever title for this one)
To hold the bulk of mini yarn wrapped wreaths, I hung a few on the spinning rack above and some on the clothes rack with the larger wreaths. For the rest I placed them in a handled woven basket that I also picked up at Goodwill. At some point I hung the basket from its handles on the clothes rack, but later put it on the floor.
Note for next time: I think next time I should either make space on the table or get another accent table.
 |
| The wire basket added a little height and gave me a spot to tuck some battery-operated tea-lights underneath. |
This is another basket I used in my display. This time it is wire basket with clear crystals woven through. I turned it upside down and placed some of my hoops on top and propped up some of my flower sets on the side.
Store-bought Items + Handmade Items

Light Me Up
Picked up at Target for less than $17 each, the set of two lamps with the hollow, acrylic bases were perfect for my needs. Lightweight. Inexpensive. Neutral. And as an added bonus, the hollow bases were a perfect niche to tuck a few of my mini hoops mini wreaths on little wooden easels or even a ball of yarn.
I also bought a clip-on desk lamp to illuminate the large framed bulletin board I showed you earlier in this post. And to add some ambiance, I bought a handful of amber colored tea light holders and battery-operated tea-lights to scatter around the table. I love the flicker! I also put a few underneath the upside down wire basket shown.
The Price is Right
I am a paper lover. So any way I can throw in some paper-crafting, I'm all for it. Very similar to my product tags I make for all my handmade items, I used kraft paper, my favorite font, my printer and a paper punch to make several small signs, naming the item and the prices. I displayed these signs in a few different ways:- I pinned directly to the bulletin boards.
- I made little stands using mini wooden spools of thread (from the craft store), yarn and decorative stickpins. These were so fun to make!
- I taped to the container of the items (such as the cigar box or spinning rack).
- I hung from a string on a yarn-wrapped tree.
 |
| To make the little stands for my price signs, I wrapped a short length of yarn around the small wooden spools and hot-glued in place. Then I taped the sign to decorative floral pins and stuck in the hole. To keep from falling over, I added glue dot on the bottom. |

Wrap It Up
To go along with my cozy, home-spun feel of my booth and tie in with the yarn-wrapped wreaths that I sell, I had fun incorporating yarn into my display.- As I mentioned above, I created price tag stands using a bit of yarn wrapped around wooden spools.
- I used small balls of yarn, kept together with a few decorative stickpins, as accents in my display. I tucked one in the lamp base, and placed some on the trays with my hoop art.
- And because this was a holiday show after all, I made a few yarn-wrapped trees. To add some sparkle, I stuck a star stickpin on top.

I Saw the Sign
The biggest item that I made for the craft show was my shop sign. When you are selling at a craft fair, you must have a banner or sign of your shop name. It tells your customes who you are and represents your shop at a glance. So it was important to me to have something handmade, reminiscent of my product and just plain pretty.
 |
| My shop sign is made of an 18-inch quilting hoop, felt and embroidery thread. |
Instead of ordering a banner, I decided to make an over-sized version of my hoop art using an 18-inch quilting hoop, felt and embroidery thread. It took several days to design and create, but I love how it turned out!
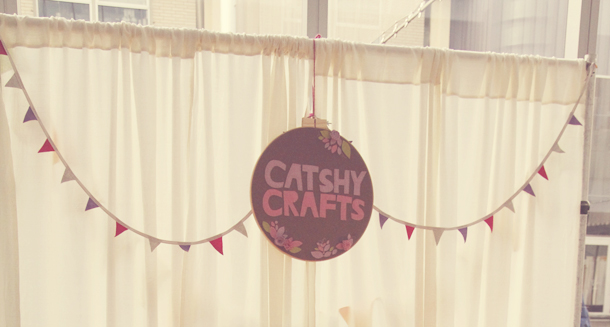
I bought a wire easel at Joanns to display on the top of my table, but when I found out that my booth would have a curtained structure to hang my sign from, I changed up my layout. I hung my sign from a length of yarn and added my felt bunting on either side. Not only did this free up valuable real estate on my table, but gave me more visibility.
*****
So, there you have it. My craft show booth display! Before I go, here's another overview photo with my key items labeled. I hope you enjoyed the tour of my booth and some behind-the-scenes peeks at creating an awesome booth display using a mix of vintage, store-bought and handmade. If you have any questions about a specific item or other anything in this (super-long) post, please leave me a comment below.

Have you read the other posts in my mini blog series on my first craft show?
Here are the links:

Thanks again for stopping by today!


12 comments:
This whole setup is divine. Let me be you just so I can have this awesome of a booth !! Haha. Definitely following your example if/when I'm involved in a craft fair.
Also just noticed the new favicon. Super cute!
Thanks so much Megan :) It was a fun/nervewracking/rewarding/overwhelming experience, but craft fairs are definitely worth the effort. I hope you will do one one day...and show us photos of your booth!
And thanks for noticing my new favicon :)
Oh wow I was hooked by the first photo and then kept reading and realized you are a local! Well Kind of! I'm over in edmonds but I'm actually a member of EtsyRain! Great post and I hope you did well that weekend I heard it had a good turn out! See you around! ;)
(fyi I'm Kaitlin from StunninglyStrange - stunninglystrange.com)
Hi Kaitlin!
Yay! Thanks for visiting my blog :) Maybe we'll meet each other at an etsyRAIN function one of these days!
I'm off to check out your site!
Have a great day!
Cathy
I just revisited this post and it made me think of all the Christmas markets I did a few weeks ago. You have so many great ideas in this post. And I just love looking at the photos. It made me think I should write a round-up market post on my blog ... just to show off all the things I used in my booth. I have to admit I LOVE putting together my booth. I think it is on of the best part of selling at markets! :-)
xox,
Ursula
There are many banner stands that are available today which come in many types of materials.Mega imaging offers Banner Stands Canada and also designs & prints banners, posters, vinyl graphics, exhibition stand for Ontario, Toronto and other provinces in Canada.
You can find some really quality exhibition displays at http://www.vividads.com.au/
Using Trade Show Exhibits certainly boosts your marketing effort and you will certainly get a better result. custom rental exhibits
Amazing displays and nice post about craft booth displays. trade show booth design
Nice Bed Linens. Thanks for sharing it.
Display Easel Your article has piqued a lot of positive interest.I can see why since you have done such a good job of making it interesting.
Post a Comment
I'd love to hear what you think! I love reading your comments.