A few months ago, I blogged about
my first craft show experience as a seller at the
etsyRAIN Handmade Holiday Show. When I was invited to participate in the
show (you can check out my blog post about the show
here or a review of the show
here), I was very happy to be chosen. But. (There's always a but, right?) I quickly got overwhelmed with all the things I would need to do. Making enough inventory. Creating an awesome display. Interacting with customers. Taking credit card orders. Even the thought of making change was giving me angst.
Now that I look back on the whole experience, I can say that it was worth all the worry and effort. And I would definitely do it again. There were things I would probably do differently, but all in all I think it went well! Plus, now I can share my experience with you and give advice to some of you lovely makers who are thinking of doing a craft fair yourself.
And if you're not a maker, but a lovely buyer or lover of handmade....first of all thank you for supporting handmade! Without you, I would not be in this business. I hope you will enjoy a behind-the-scenes look at preparing for a craft fair.
*******
So here we go! My ten tips for surviving your first craft show. (Plus, as a bonus for reading all 10 tips, I've added some online resources at the end of this post!)
1. Get Schooled
Once I committed to doing the show, I had about 3 months to prepare. The first thing I did was
read all I could find on the topic of craft shows. (At the end of this post, I listed some of the online resources I used.) I searched the web and pinned
inspiring booth displays. I talked to other makers who already had a few craft shows under their belt. I read
forum threads. I even
attended a crafty conference, specifically to attend the class on
Craft Show Vending from A to Z (taught by the organizers of Urban Craft Uprising). All this research helped me figure out what I needed to do, what I needed to buy and most importantly let me know that
everyone is nervous their first time selling at a craft fair!
 |
| School House Craft Conference in Seattle WA |
2. Break It Down
I am not usually a to-do list kind of gal, but because I had so much to accomplish before I was ready for the show, I decided to
make a list. I listed all the things I needed to do and put them in my planner. I spaced it out so each week I had one or two tasks to do. For example: Order a credit card reader. Order more business cards. Make a store sign/banner. These were manageable chunks I could do and check off my list.
Some of the things on the list couldn't be done in one sitting. For example, I had to create enough inventory to fill my booth. Most of my items are
made-to-order or
personalized, so I didn't have much inventory to start with. Creating and designing a decent stock of items took me several weeks. But I did it a little at a time. To make it even easier, you could break this task down even further such as make 20 hoop art. Make 50 flowers. Etc. For me, I just kept making until I thought I had enough inventory to fill my craft display.
The other task that took several weeks to complete was:
designing my booth display. This, in fact
, turned out to be my favorite part of the entire process!
For this task, you can break it down even further: choosing table/chairs; deciding on lighting; creating signage; choosing display items (racks/shelves/etc.).
(In my next post in this blog series, I will show you how I used vintage finds in my display.)
3. Shop at Home
Before you head out to the store for items for your display,
take a look at what you already have at your home. Chances are you can find many things to use in your crafty display.
For example, do you use props when you photograph your items? I have a wooden tray that I love to use for my product photography. It is carved. It has a richly stained patina. It has scratches and is well-worn from use. If you read this blog, you may remember
when I picked it up from one of my favorite thrift shops last year. It continues to be my go-to photography prop. Not only is this item doing double duty, it will tie back to your online shop. It's nice to have continuity between your Etsy shop and your craft show presence.
 |
| This tray has served me well! |
Other things to watch out? Look for small tables, jewelry stands, sheets, tablecloths or baskets that may work for your display.
4. Repurpose
When you're looking around your house for items, think about ways you can
repurpose household items for your display. For example, I repurposed a clothing drying rack as a wreath display. A small round table as a place to display my business cards and mailing list sign-up sheet. I used an empty basket (placed upside down) as a way to add height to my display. I even turned a picture frame into bulletin board to display my hoop art. Be creative (and save money in the process.)
 |
| This is a clothes rack that I repurposed as a wreath display. |
5. Set Up Mock Display at Home
One valuable piece of advice that I heard during the
School House Craft Conference was to
set up a mock display of your booth at home.
Measure out the space you will be allotted and set up your tables, chair, lighting and other display items.
This will give you a great visual of how much items you can bring, where you will sit. You can also play with your display to see what goes best where.
 |
| This is one the very first mock displays I set up. I had a card table with a bedsheet on top. A vintage luggage table on top of that and thrifted bulletin board propped up on plate racks. If you compare this mock-up to the display at the show you can see it changed quite a bit. Feel free to play with your display until you're happy. |
This mock-up will help you plan your display and help you figure out what you need to bring. You can gauge if you need to make more items to fill a hole in your display or if you have to scale back to avoid looking cluttered. As a bonus, it also serves as a place to store your items as you make them. As you can see, my mock display went through several versions before I settled on one I liked best.
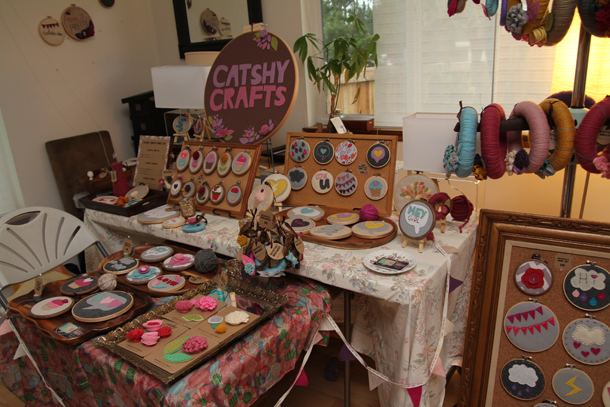 |
| This is later version of my display set up in my living room. It's a lot closer to my actual set up of the show. What is different? I added a 5-foot table. I added more items on display. I added lighting (two table lamps and several small battery-operated votive candles). I added a large display piece for my hoop art. I created price list/sign as well as smaller signs next to each collection of items. I added felt bunting. |
6. Ask for Help
No lie. Craft shows are a lot of work. So
ask for help early and often. For example, ask for help loading and unloading the car. Ask for help setting up your display. Ask your friends and family to visit you at the show. Or better yet, ask a crafty friend to sit with you during the show (a few hours or even the entire day). He or she may be curious about behind-the-scenes or want to shop the show.
Also, it helps to talk with other people who have already done shows. They will give you tips and reassure you that you can do it! I often looked at
this Etsy Team's Forum for encouragement and advice.
For my first ever craft show, I had the support of my husband (who helped me load my car the night before and unload the day of the show) and my oldest daughter who sat with me for the first 3 or 4 hours of the show (what a trooper!). On the second day, my friend Hannah kept me company the entire day, watched the booth during bathroom breaks and got us lunch and even got her friend to help us break down the booth and load up the car. She was a lifesaver!
So, yes, do ask for help. If you can't find anyone to help, most shows have volunteers on hand who can help you unload or fill-in for you when you need to take a bathroom break or just want to stretch your legs.
 |
| Pretty Please Hoop Art by Catshy Crafts |
7. Prepare for the Big Day (the night before)
To make your big day go smoothly, take time on the night before to
have all your ducks in a row.
Print out the Vendor FAQ/Instructions from the craft show organizers.
Print out directions to the venue.
Pack your car the night before. Make sure everything will fit.
For a wonderful checklist on what to bring, go
here.
Get enough sleep.
Take a deep breath. You're almost there!
8. Be Friendly (during the show)
This is probably an obvious tip....But if you're shy like me, this might be a tough one. Try to be super-friendly with everyone involved in the event. From the organizers to your booth neighbors to the volunteers and of course, the customers! Say hello to everyone who enters your booth. It's a compliment to you that they are stopping to take a peek, so the least you can do is say hello.
 |
| Don't forget to say Hello to your customers :) |
For me, I tried to say at least a "Hello" with a friendly smile. If I was brave, a "how are you?" or "how is your day going?" was a good opening.
By no means, do you have to change your entire personality overnight, but at the same time you don't want to offend anyone by not acknowledging someone when they enter your booth. Even a nod or a smile is enough. Again, this is probably a given for many, but for my shy ones out there, I know it can be difficult! But don't feel bad if your neighbor happens to be a chatty one and you feel quiet in comparison. She is probably just being her natural self. And you should be too. But because you are there to make sales after all, push yourself a little outside of your comfort zone.
 |
| Banner Ad for the first craft show I ever did. |
9. Reward Yourself (and all your Fabulous Helpers) After the Show is Over
After the last part of your booth is broken down and reloaded into your car,
celebrate! Pat yourself on the back for a job well-done. You are no longer a craft show virgin! Yay! Celebrating your success is so important, especially after you've spent days, weeks, months planning for this event.
Better still, celebrate by treating your friends or loved ones who helped you at the show to a round of drinks (or coffee or tea). Thank them for their help, their support and being there for you.
 |
| Celebrate your success! |
10. Reflect
After the show is over (whether it be the next day or weeks after or both),
take time to think about what you've accomplished. Reflect on all the work you put in and the great things that came about. Did you meet new crafty friends? Did you get the positive feedback you were craving? Did you make a few sales? Did you accomplish one of your crafty dreams?
Write a blog post (like I did). Write in your journal. Share your experience on a forum. Tell a friend. It is a great way to look back and see what worked and what didn't. So that the next time you sell at a craft fair, you'll be ready!
 |
| Reflect on yourself and see how much you've grown! |
I hope you found this list of tips useful. If you have other tips to share, please leave a comment. I'd love to hear what you have to say!
***Bonus: Online Resources for Craft Fair Sellers
And as promised, here are a list of resources that I turned to during my months of craft show prep. There are so many helpful creative folks who have gone before you who want to share the secrets to their success.
Coming Up
In my next post in this mini-series on craft shows, I will share how I designed my craft display using vintage finds! Here's a peek of what's in store.
Hope you will join me! Until next time, happy crafting!







 Posts
Posts


